
Are you looking for an easy guide to start a blog and make money online? You’re in the right place!
I have created this step-by-step guide for beginners like you, to help you build your own self-hosted WordPress blog in 2024 without any hassle.
It is a roadmap that keeps you focused on what truly matters, while avoiding all the extra stuff that can waste your time and money.
By the end of this quick tutorial, you’ll see that starting a blog is as easy as making your morning coffee!
With the right guidance, your grandma could have a blog up and running in 30 minutes!
A humble start can lead to big success! – Cindy
Here’s a sneak peek at the 6 simple steps to get your blog started.
How to Start a Blog in 6 Easy Steps
- Choose Your Niche and Domain Name
- Choose a hosting service to get your blog online
- Customize your blog to make it look good
- Publish your first post
- Promote your blog online and start making money
If you get stuck or have questions at any point, simply send me a message here or leave a comment below. I will personally answer all the questions from my readers.
About Me
Before we get started, let’s get to know a little about me.
My name is Cindy. I began my blogging journey in 2017 with the goal of making money online, and since then, I’ve launched several successful blogs across different niches: coffee, outdoor adventures, recipes, parenting and more.
Here’s a quick look of my recent monthly income reports from 3 of my blogs. While each earning might not seem huge on their own, together they add up to be enough to support my lifestyle.
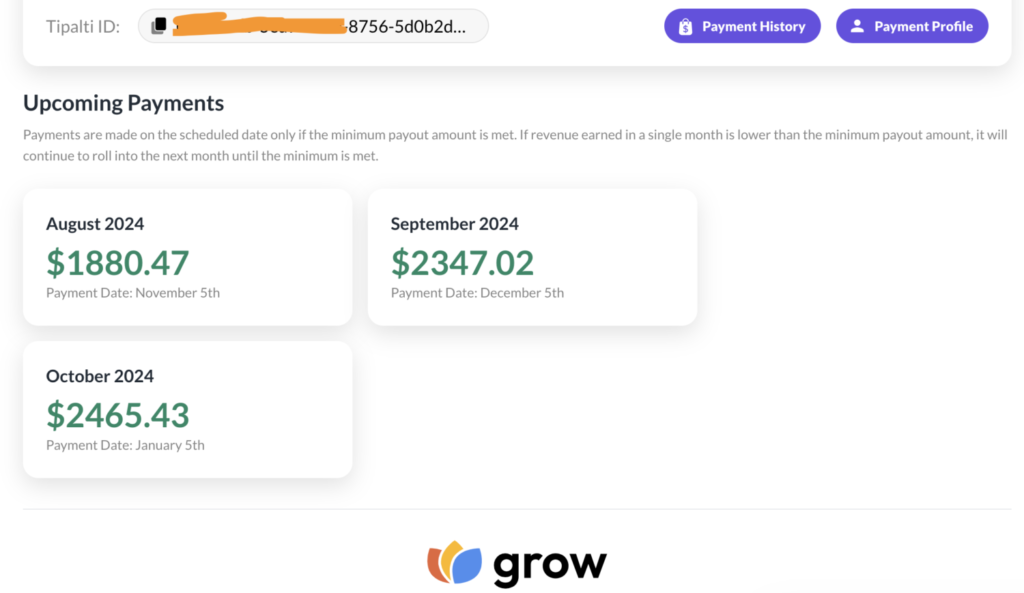
Yes, I left my nine-to-five job five in 2018!
I still remember how tough it was for me to get started. I didn’t have a clear roadmap to follow, and it felt like there was so much to figure out:
Registering a domain, setting up hosting, customizing WordPress, and, most importantly, creating great content and driving traffic to it.
I learned the hard way – making mistakes, spending money on more than 5 online courses, and sometimes even going down the wrong path. But the biggest lesson I’ve learned so far is this:
Take the easiest path and stay focused.
With all the noise out there and so many “gurus” saying that beginners like you can easily make $200+ a day, it’s super easy to get overwhelmed.
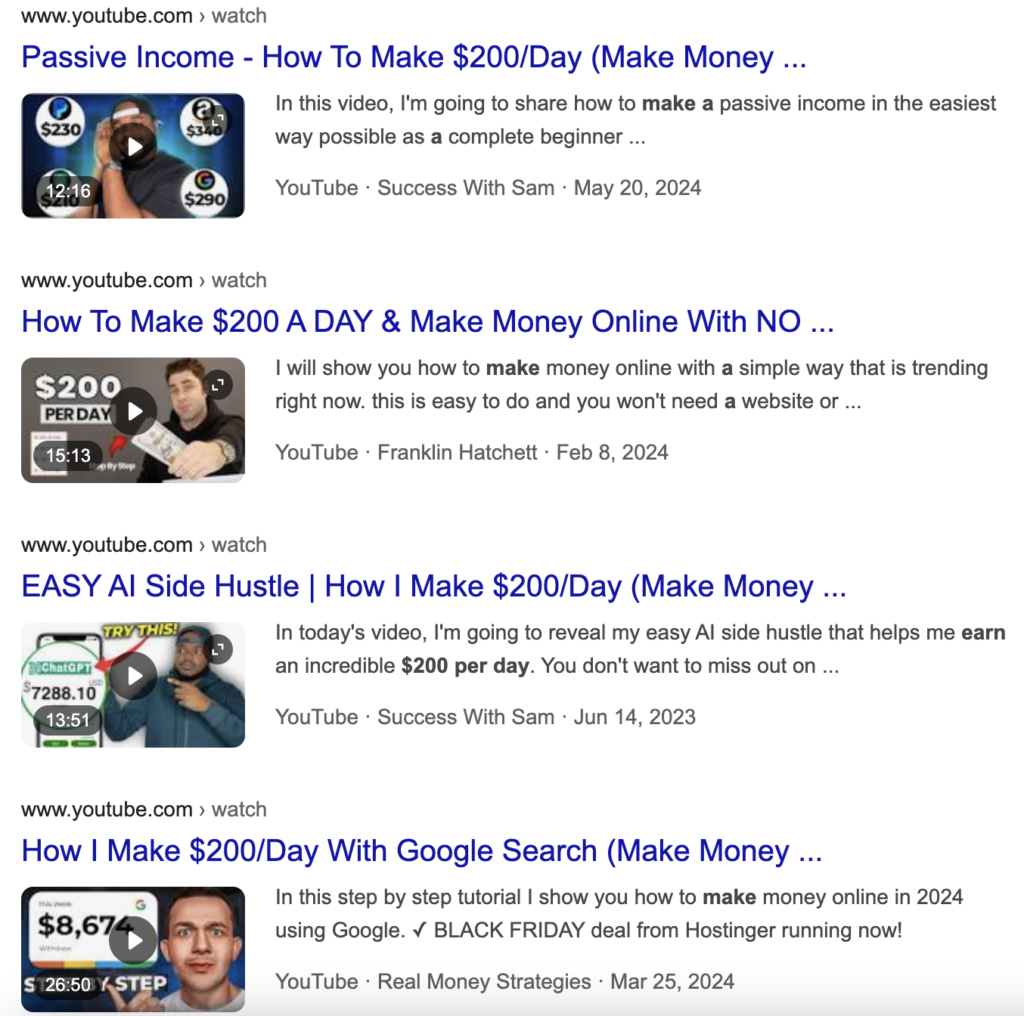
You might end up buying their expensive marketing courses or online tools they recommend by their affiliate links, only to make very little money, feel frustrated, and eventually think about giving up.
That’s exactly why I created this roadmap for beginners like you. I will help you choose the easiest path and start seeing small wins with a small budget.
With under $200, you can start making money in a month or two, if you’re doing things the right way. And once you achieve small success, you can scale up for bigger wins, just like I did.
This is the mindset you need as a beginner. If you want to learn more about me, just head over to this page.
Now, let’s get this show on the road!
Step 1: Choose Your Niche and Domain Name
Unless you’re planning to start a personal blog where you just write about whatever pops into your head, a blog built to make money online should always start with a niche.
In this guide, I recommend picking a niche that does well on Pinterest, since Pinterest is the easiest traffic source for beginners.
Head over to https://trends.pinterest.com/, click on the ‘Interest’ drop-down menu, and pick the one that sparks your passion.
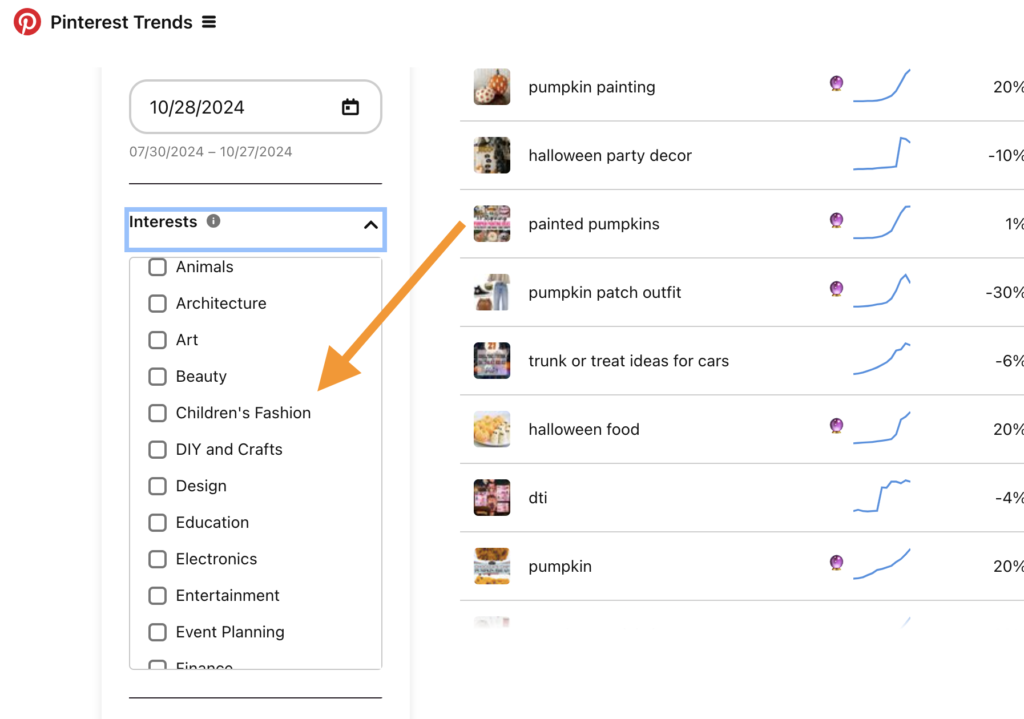
You can also read my blog post 16 Niches That Works Great On Pinterest to find niche ideas that work for you.
Let’s say you are passionate about Food and drinks. Now go to ChatGPT, ask for domain name ideas. The prompt looks like:
My name is Cindy, I want to start a food and drinks blog, can you suggest a few cool domain names? It must fit the requirements below:
- Keep it simple and short.
- Avoid long or complicated words.
- Make it relevant to my name. (optional)
- Avoid numbers and hyphens.
ChatGPT will suggest a few cool domain names for you to choose from. If you are not happy with the results, just ask it to suggest more.
If you have decided on a domain name, then go to https://www.namecheap.com/ to see if it is available from registration.
In this case, I am happy with MealsByCindy.com suggested by ChatGPT.
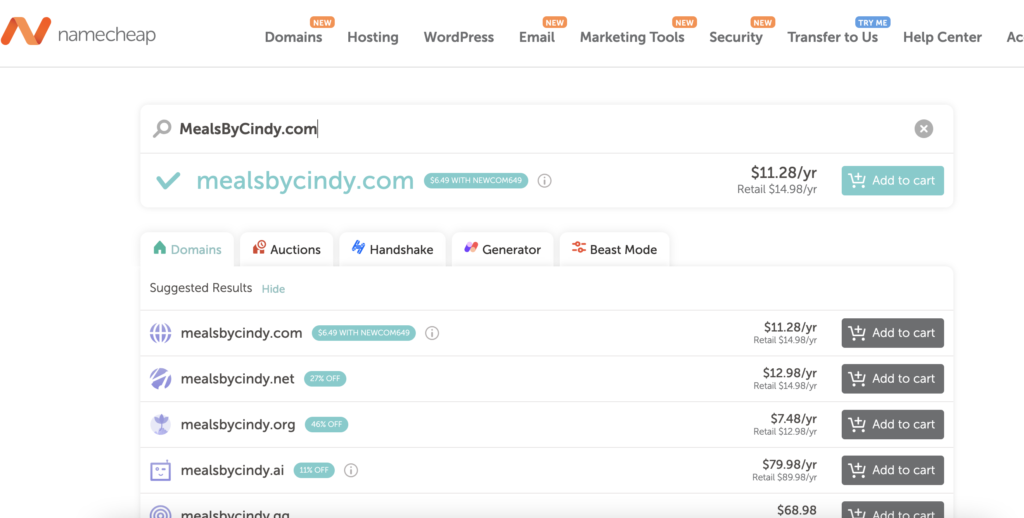
It is available, so I will proceed registering the domain with Namecheap. It is quite easy, and you can refer to this guide from namecheap: How to register a domain name with namecheap.
Step 2: Choose the Best Hosting for Beginners
Next, you’ll need a place to host your blog. I recommend starting with HostGator for beginners. It’s affordable, easy to use, and comes with solid customer support to help you if you get stuck.
Some other bloggers recommend BlueHost, but personally I find that Hostgator is slightly faster than BlueHost.
I’ve been stuck with Hostgator for over 6 years, and never had any issue with them. It is also pretty enough to handle 7K+ visitors per day.
Set Up a HostGator Account
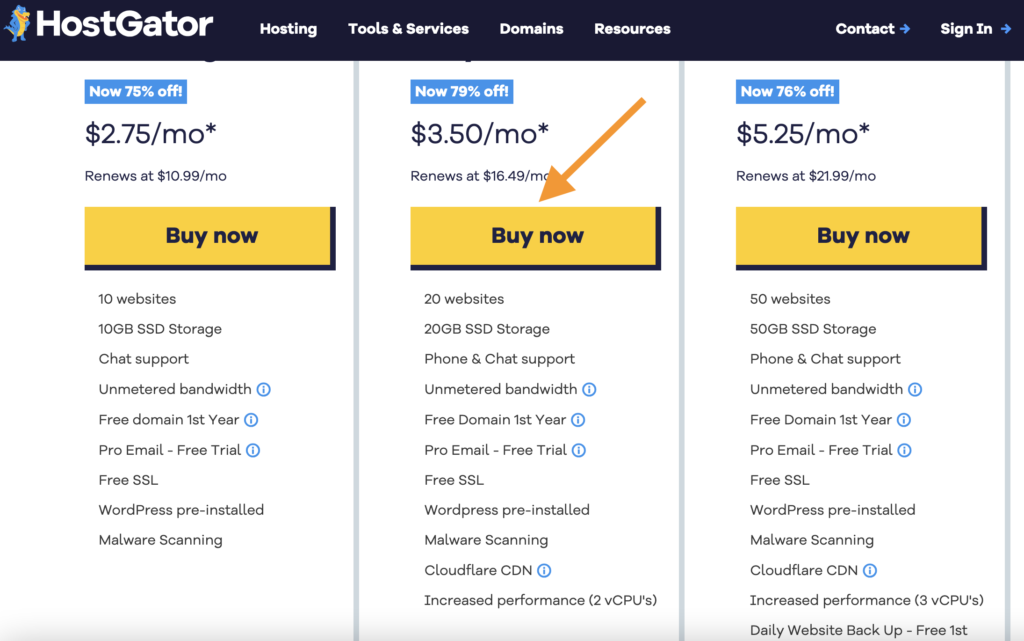
Go to HostGator’s website and select the plan that works best for you. The “Baby” plan is perfect for beginners, and it was my choice when I just started out.
Hostgator offers a free domain for the first year, but it also charges Domain Privacy + Protection fee for $14.95, which is just not worthy.
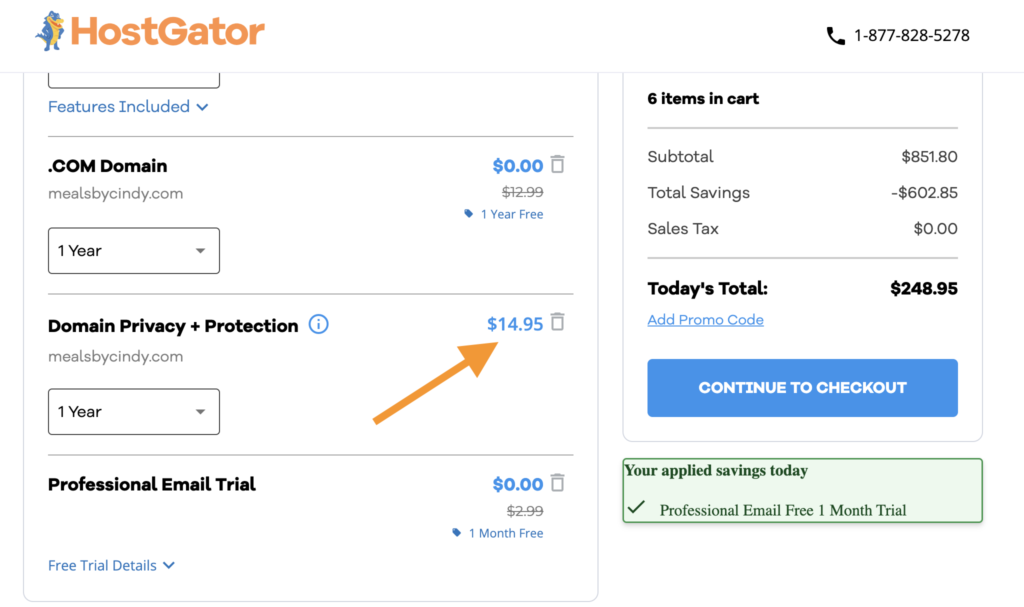
But with namecheap, you only need to pay about $11 for a .com domain, with free privacy protection.
Tip the option ‘I want to use a domain I already own’, and enter the domain name. If you are still not sure what domain name to use, you can click ‘Choose domain later’.
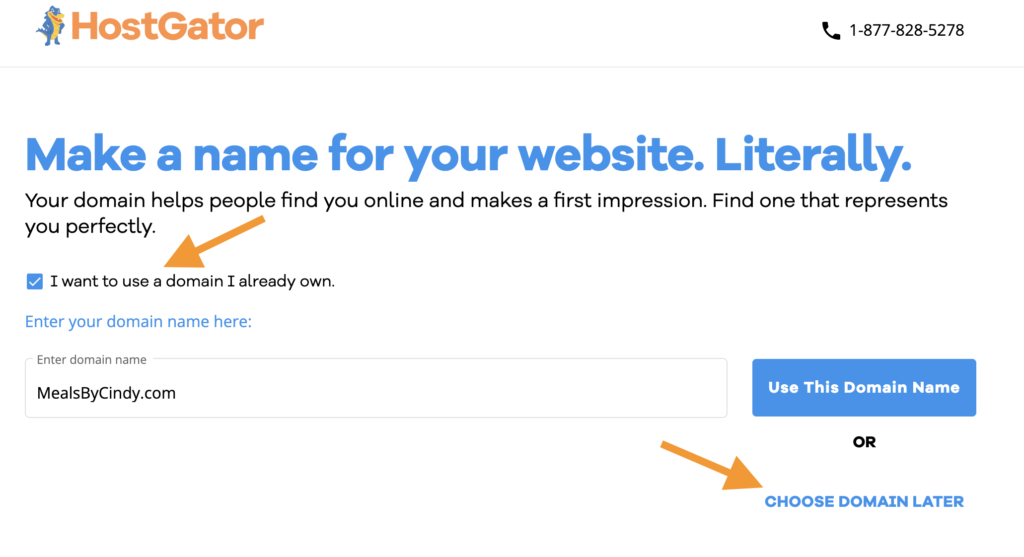
In this case, click ‘Use This Domain Name‘ to proceed.
You need to be careful at this stage to avoid spending extra money that won’t help.
By default, hostgator will select 3 Years’ hosting service for you. Change it back to 1 Year.
It could also add some additional service that you don’t need (free trial for the 1st month or year) to your hosting package. You will be automatically charged after the free trial is over.
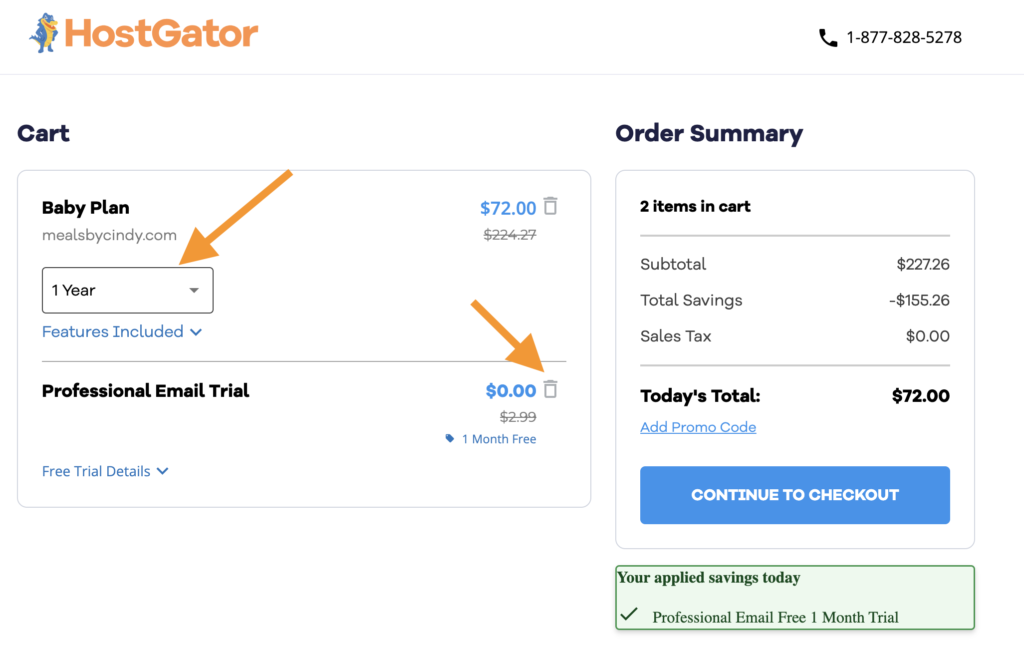
Remember: you only need to purchase its hosting service, and you don’t need any other service.
Click the trash icon at the right of ‘Professional Email Trial‘ option to delete it, and then click ‘CONTINUE TO CHECKOUT‘ to proceed.
Now you have come to the checkout page.
Fill your billing information as below. The most important information is your Email and password. Make sure to remember your password and store it somewhere safe.
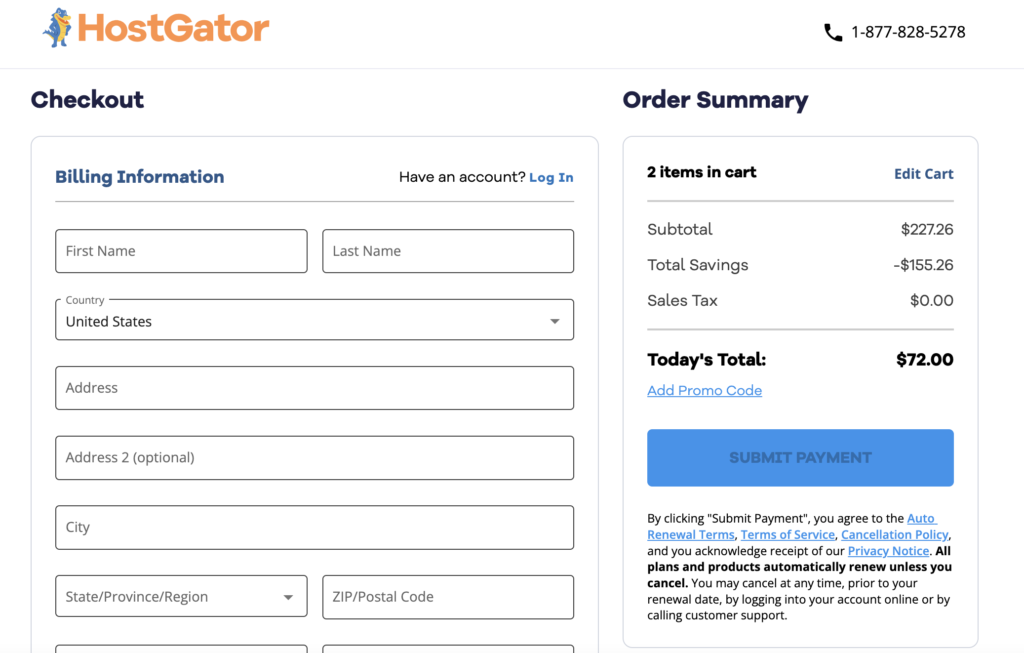
And finally, choose your credit card or Paypal to pay.
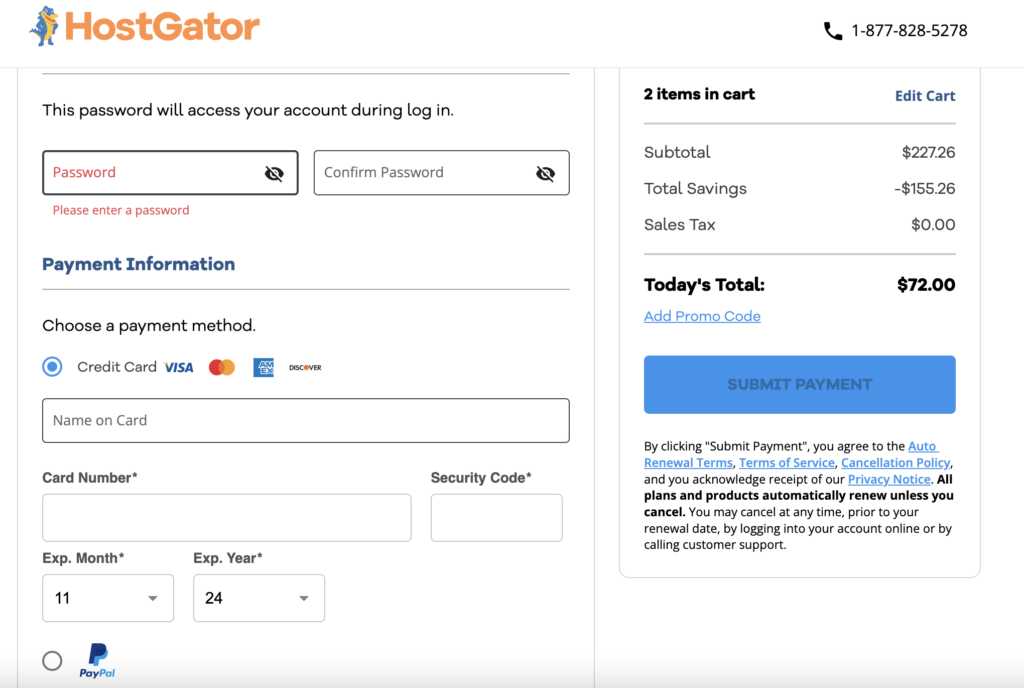
After the payment is made, your Hostgator login details will be sent to your email in 20 minutes. Take a break now.
- Tips: If you have any question during your purchase, just click the ‘Chat’ icon at the right down of any Hostagator page to get instant customer support. They will be happy to answer any questions you have.
Step 3: Customize your blog to make it look good
After setting up your HostGator account, you’re ready to install WordPress. WordPress is the platform that makes blogging easy – think of it as the engine behind your blog.
Connect your domain with your hosting
This is one last step before you can start installing WordPress and customizing it. It is also super easy to do.
Go to your Hostgator Dashboard, click ‘Hosting‘ tab on the left, scroll down to ‘Server Information‘ section, you will find your DNS records. Mine is as below:
- hgns1.hostgator.com
- hgns2.hostgator.com
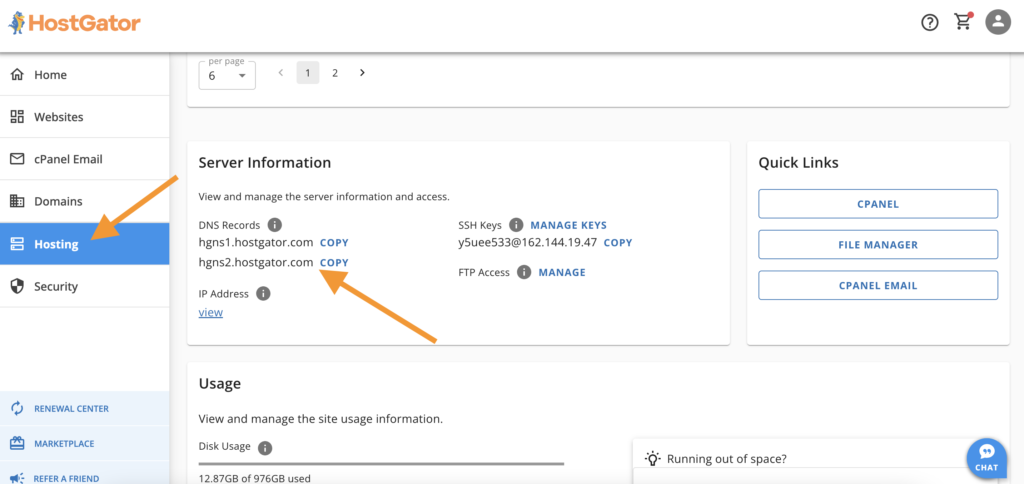
Next, go to your Namecheap Dashboard, click ‘Domain List‘ tab on the left, scroll down to Nameservers section, select ‘Custom DNS‘ option from drop-down menu.
Fill your DNS records from above.
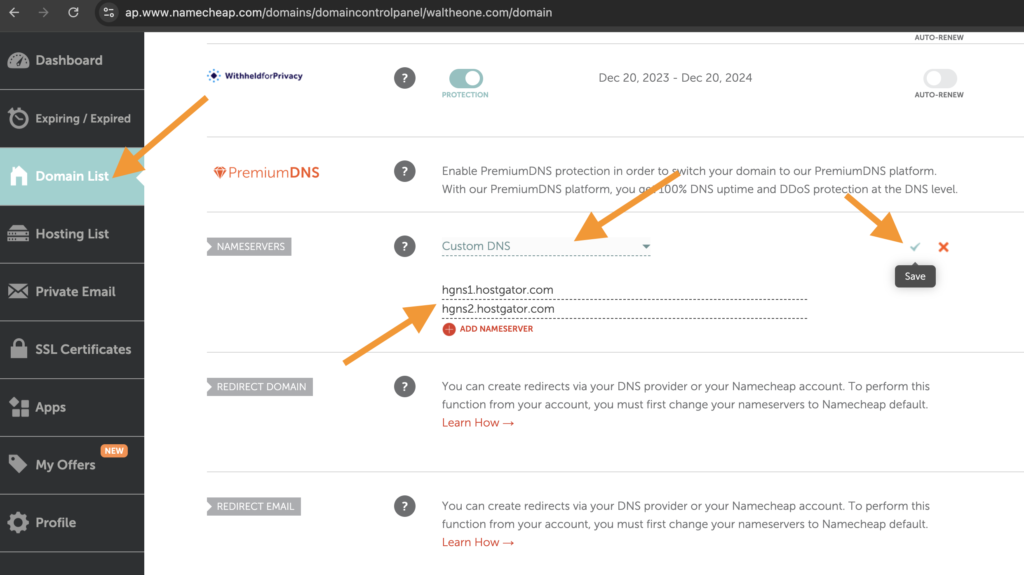
Done! Your domain is now connected to your Hostgator server, which simply means that your visitors can visitor your website content (blog posts, images, etc.) via your domain name.
Please note that it may take up to 24 hours for the DNS update to go into full effect.
How to install WordPress in HostGator
Log into your HostGator dashboard.
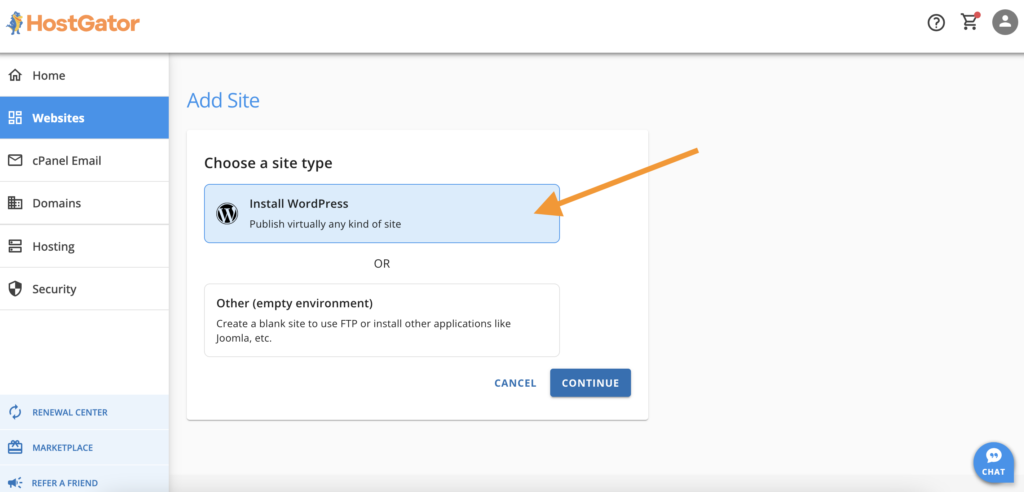
Select ‘Install WordPress‘ and CONTINUE.
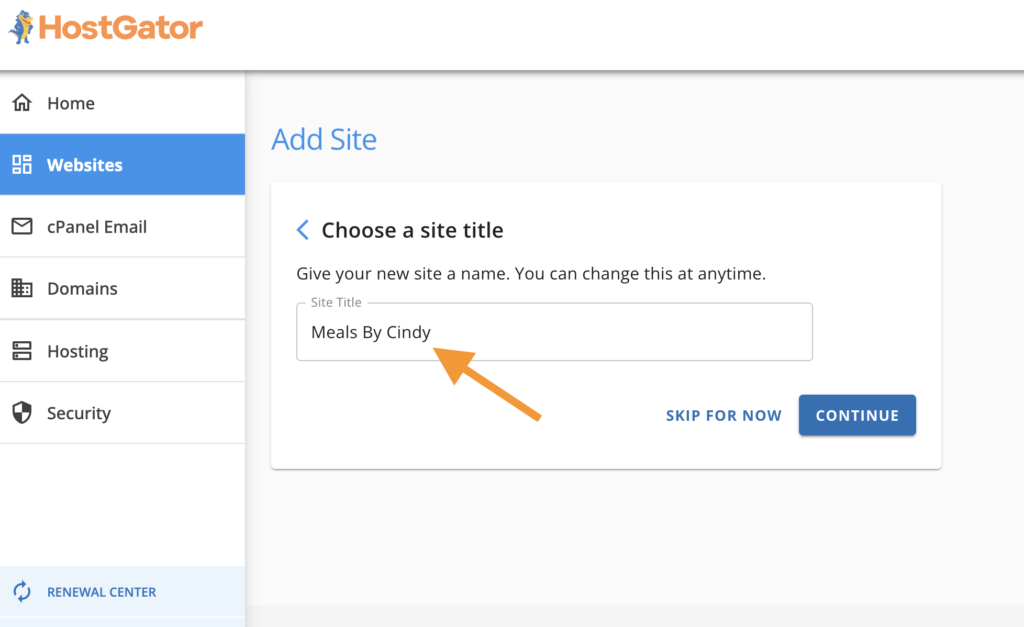
Input your site title and CONTINUE.
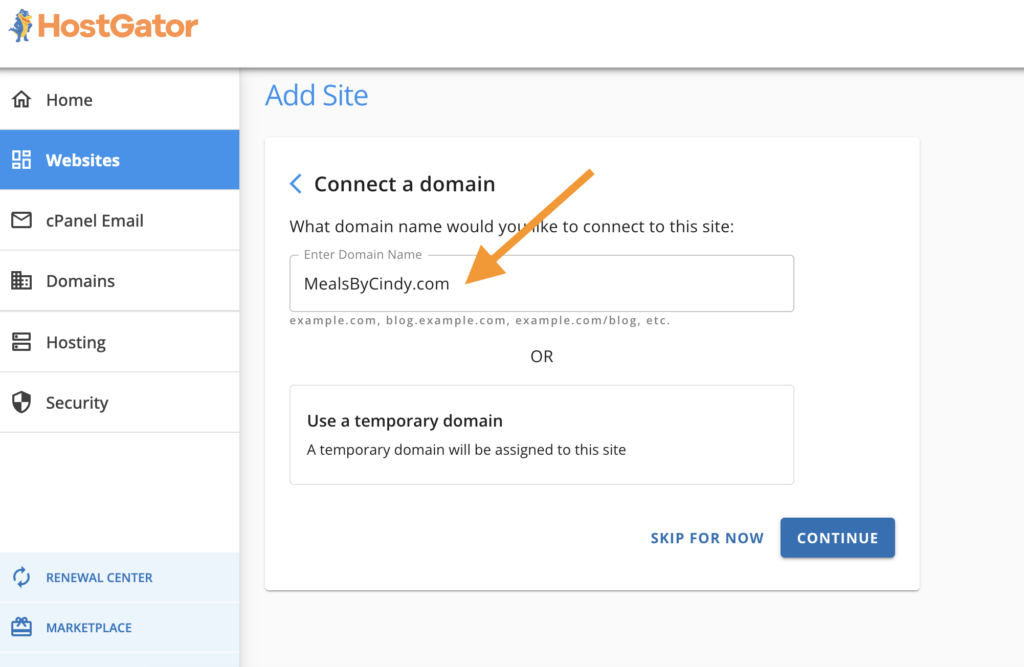
Enter your domain name and CONTINUE.
And the WordPress installation will start.
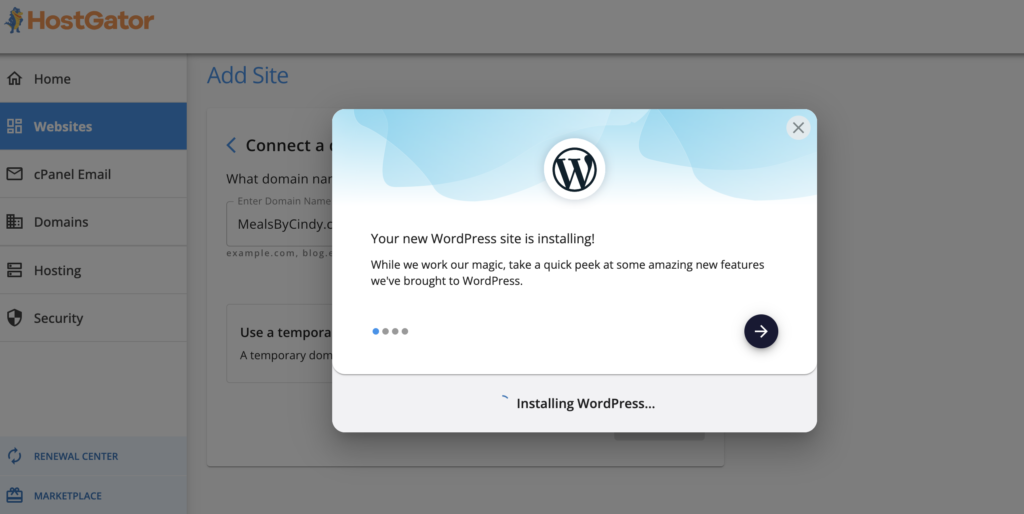
Once WordPress is installed, Hostgator will redirect you to its own WordPress interface which we don’t need. Click ‘Exit to WordPress‘ at the top left.
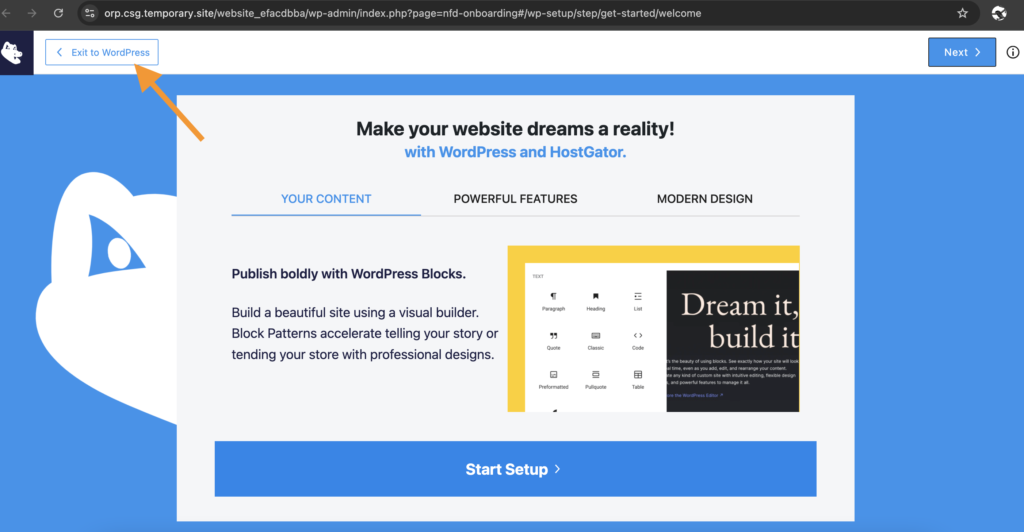
Note: if you look at the address bar, you will see that Hostgator assigns a temporary URL to you. Do not panic as it will be automatically changed back to your domain URL after the DNS takes into full effect from Hostgator’s side.
Remove The Chaos!
Now we come to the WordPress dashboard, but it is still a mess thanks to Hostgator:
It pre-installs its own plugin to ‘replace‘ the WordPress default dashboard to stick with you and make more money from you.
Not only does its messy plugin slow down the site speed, but it also brings more chaos and distraction during your blogging journey.
So click the ‘plugin‘ icon from the panel on the left, bulk select all the pre-installed plugins by Hostgator, click ‘Bulk actions‘, select ‘Deactivate‘ from drop-down menu, and click ‘Apply‘ button.
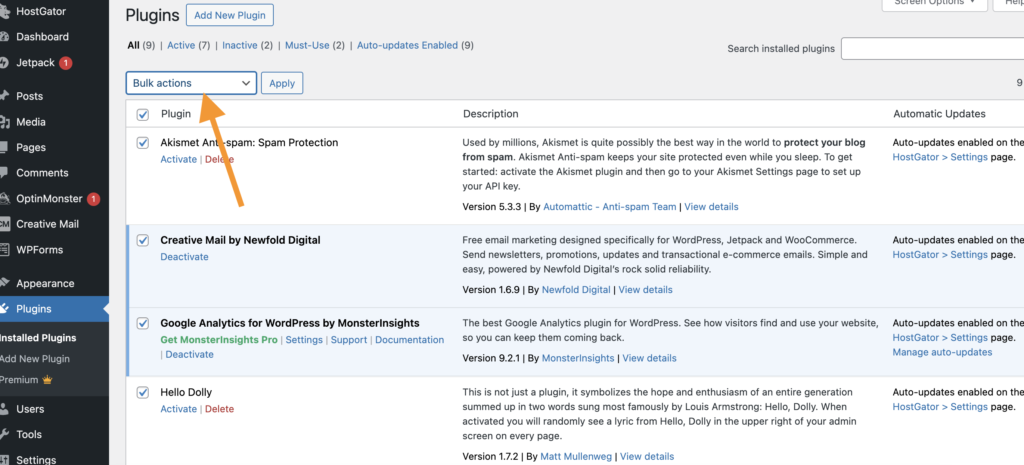
Bulk select them again and delete them. Finally, we have a clean WordPress dashboard!
How to Choose Your Theme
On WordPress, your theme is basically the look and style of your website. Don’t spend too much time trying to pick the “perfect” theme right now—it’s not super important at this stage.
Just pick a free clean and lightweight theme. You can always come back and redesign your theme once you’re making some real money!
For now, just go to Appearance -> Themes -> Add New Theme, and pick a theme that is clean and simple.
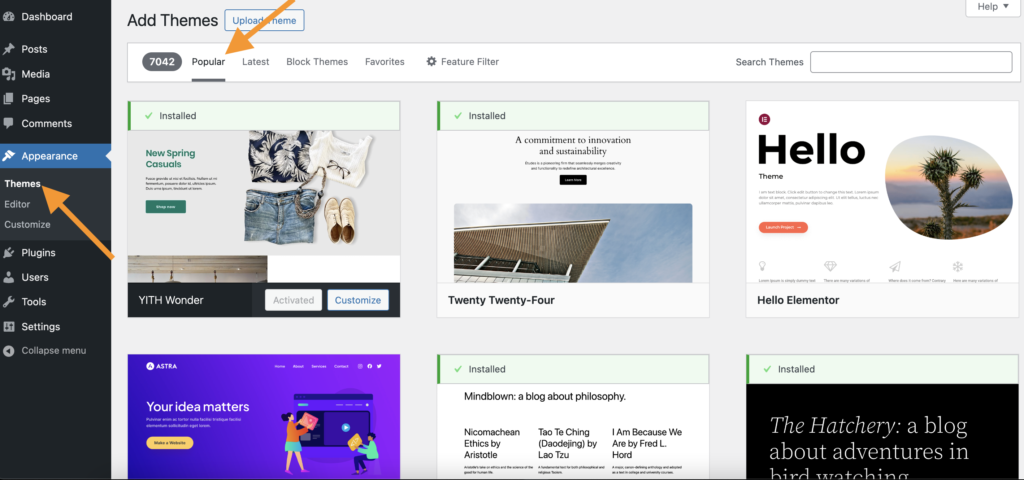
Personally, I like GeneratePress and Astra because they’re lightweight, fast, and easy to customize.
Tip: You don’t need to upgrade to the pro version of any theme just yet!
- Read more: 10 Best Free WordPress Themes In 2024
How to Install WordPress Plugins
You can easily get extra functions to custom your blog by installing more plugins. But note that More activated plugins = slower loading speed.
Click ‘Plugins‘ from the left panel, and then click ‘Add New Plugins‘ at the top. Input the plugin name below to the search bar.
Find the plugins you need, and click ‘Install Now‘ and ‘Activate‘.
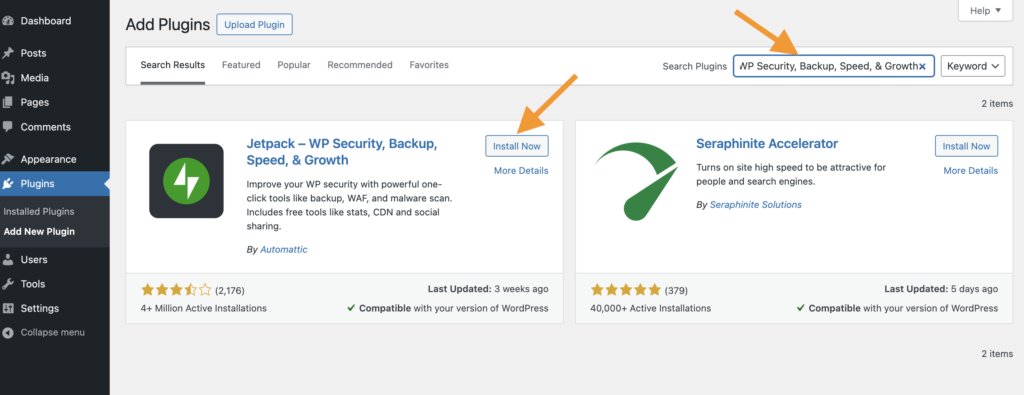
Here are the only free plugins I recommend to get started with. Good news is that: you don’t need to keep them active all the time.
- Jetpack – WP Security, Backup, Speed, & Growth
This plugin helps you track traffic details like sources, page views, and outbound clicks. It’s quite enough for beginners.
- Simple Social Buttons
This plugin allows your readers to share your content on social media like Pinterest or Facebook, from your posts, which can help drive more traffic to your site.
- Weblizar Pin It Button On Image Hover and Post
With this plugin, your readers can save your images to their Pinterest boards when hovering on the image, which is great for driving more Pinterest traffic.
- All in One SEO or Yoast SEO (optional)
If SEO is part of your long-term blogging plan, this plugin can help optimize your posts for search engines like Google, Bing, Yahoo and DuckDuckgo.
But if Pinterest is your main focus, you can skip this one.
- UpdraftPlus – Backup/Restore
Monthly backups are a smart move to keep your blog safe. Just activate this plugin when you back up your site, download the backup files, and then deactivate it.
- Imsanity
With Imsanity, you can limit the uploaded image size to avoid uploading huge images that could slow down your pages and piss your readers off.
Again, you can activate it each time before you upload images, and then deactivate it when finished.
Tip: Don’t pay for any premium version of these plugins yet!
Simple Extra Steps To Customize Your Blog
Great! You’re now just a few steps away from publishing your first post and getting traffic!
Below are a few more resources for WordPress customization to make your blog look better and ready for your first reader.
It might seem a bit technical at first, but trust me, it’s super easy.
- WordPress Menu Setup
- WordPress Sidebar Setup
- WordPress Username Display Setup
- Contact Pages Setup
- Privacy page Setup
Don’t Forget to Remove default posts and pages
You’ll find sample posts and pages on your dashboard. Go to the “Posts” and “Pages” sections and delete them. This will give you a blank slate to work from.
Now You’re Good to Go!
Step 4: Publish Your First Blog Post
WordPress comes with an easy-to-use, block-based visual editor to edit your post. You just need to learn how to add H2, H3, paragraph and image block to publish your first blog post.
Tips: Remember to add keywords to the Alternative text tag of your image for on-page SEO purpose.
It is super easy. Why not head to your wp dashboard and give it a try now?
Don’t know which topic or niche should you write about? Writing a great blog post that your readers will get engaged with is not that hard.
My 7-day free Pinterest course will show you how to write articles that Pinterest users will love.
Sign up for my newsletter to get access to the course now!
Read more: How to get free photos for your blog post
Step 5: Share Your Blog and Start Earning Money
Now we’re at the most exciting part – sharing your blog online to get traffic! If you don’t know how to do it, then all your blogging effort will be just wasted.
There are a few different ways for beginners to get free traffic from, including SEO, Social media, Q&A Sites, etc. But the only traffic source that is worthy your effort as a beginner in 2024 is Pinterest.
Why Should You Start With Pinterest?
One solid reason: Pinterest is the Easiest Traffic Source for New Bloggers to get traffic and make money in 2024, period.
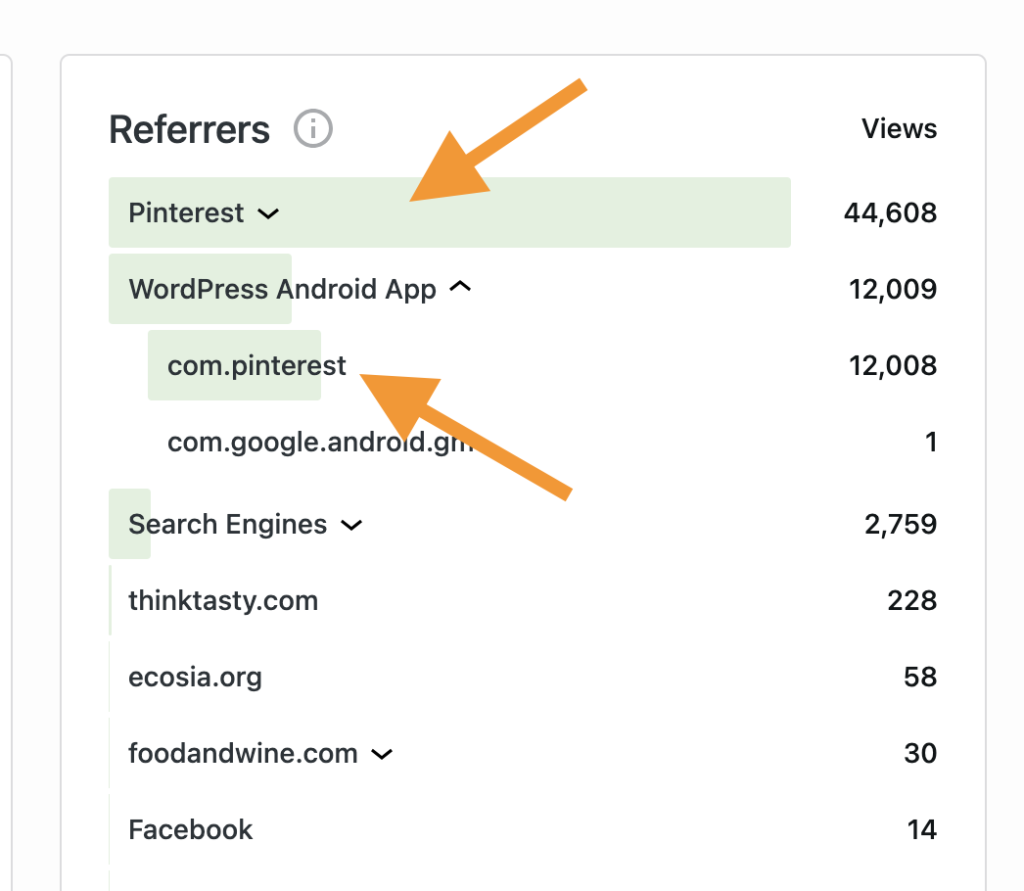
Above is distribution of traffic source for my food blog last month. You see that I rely heavily on Pinterest just because it is the easiest way.
Over 522 million monthly active users(70% women and 30% men) use Pinterest to look for ideas and things they want: finding new ideas, planing new events, discovering trendy products etc.
This makes Pinterest traffic very valuable because people are ready to learn, try, or buy, especially if you are in a women-related niches like nails, hairstyle, outfit, recipes, etc.
Focus on Pinterest when you’re starting out because:
- You can start to get a good amount of visitors quickly even if you have 0 followers.
- The traffic is high-quality and more likely to bring results.
- With the help of AI, it takes very small budget to get started and see results. Let’s say $50 or $100.
Check out my post Why You Should Focus on Pinterest as a Beginner for more tips.
If you’re ready to learn, then subscribe to my newsletter to receive my free 7-day Pinterest course. It is a quick online course to accelerate your blogging journey to small success.
So, don’t miss out—subscribe to my newsletter to get it now!
If you have any questions about how to start a blog, simply leave a comment below or send me a message here. I am happy to answer any question you might have.
Recommended Pinterest Tool: contentgoblin
Hi, I’m Cindy! I’m an online blogger passionate about helping people discover easy and effective ways to make money online.